Showing posts with label gluten free. Show all posts

Thursday, November 15, 2012

My Traditional Thanksgiving Recipes- Veganized

This holiday season I am finding myself unable to find creativity in the kitchen.  Mostly this is due to my cat being very sick and towards the end of his life.  It has been a very tough month.  So instead of sharing new recipes, I want to once again share my classic recipes that are sure to please.  I plan to make most of these recipes myself for my family this year.  Be thankful of your friends and family (especially the furry and fluffy ones) and enjoy the recipes!


Traditional Stuffing

3 1/2 cups Bread Crumbs
1 cup Vegetable Broth
1/4 cup Earth Balance
6 Celery Stalks, chopped
1 small Onion, chopped
2 tsp Sage, rubbed
1 tsp Marjoram
1/2 tsp Salt
1/2 tsp Black Pepper

Melt the margarine over medium high heat in a skillet and add the onion and celery. Sauté for about 5 minutes or until the vegetables are soft. In a medium sized pan, heat the vegetable broth until boiling. In a large bowl, combine the bread crumbs, herbs, salt and cooked celery and onion. Stir all of this to combine thoroughly. Slowly add the vegetable broth, stirring occasionally to cover all the bread crumbs. Place stuffing in a greased 9-inch square pan bake at 375°F for about 30 minutes.
*To make your own bread crumbs, cut a loaf of bread in cubes. Place on a large cookie sheet and bake at 300°F for about 20-30 minutes, using a spatula about every 5 minutes to move around the bread so it will dry out evenly.


Miso-Maple Tofu

1 1/2 blocks Tofu*
1 cup Walnuts
2 Tb Miso
1 Tb Maple Syrup
1 Tb Sesame Oil
2 Tb Tamari

Cut the tofu into 1/4 inch slabs. Combine the sesame oil and tamari. Coat the tofu in the oil/tamari combination and place on baking sheet. If any oil/tamari is left, pour over top of tofu. Bake at 350 degrees for 15-20 minutes, flip tofu and bake an addition 10 minutes.

In a food processor, combine the walnuts, miso and maple syrup until it is a paste-like consistency. Spread the paste evenly over the baked tofu. Bake an addition 15 minutes.
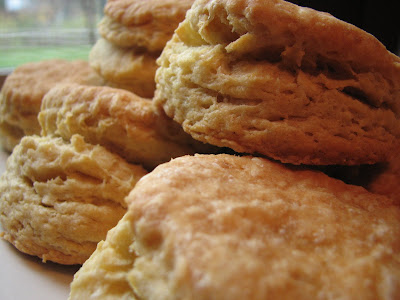

"Buttermilk" Biscuits

4 cups Unbleached White Flour
1 Tb. Baking Powder
1 tsp. Baking Soda
1 tsp. Salt
1 Tb. Sugar
1 cup Soy Margarine
2 cups Soymilk + 1 Tb. Lemon Juice

Combine the soymilk and lemon juice and let stand a few minutes. In a medium bowl, combine the flour, baking powder, baking soda, salt and sugar. Using a pastry cutter, cut the soy margarine into the flour mixture until pea sizes or smaller. Pour the soymilk mixture and blend until combined. Place dough on a floured work surface and knead a couple times. Spread the dough out to about 3/4 inch thickness and cut with a biscuit cutter. Place on a greased baking sheet and bake at 375°F for 15-18 minutes. Makes about 20 biscuits.


Pumpkin Pie

1 - 15 oz can of Pumpkin Puree
1 - 12.3 oz package of Mori-Nu Silken Tofu (Firm)
3/4 cup Organic Cane Sugar
1/4 cup Cornstarch
1 tsp Vanilla
1 tsp ground Cinnamon
1/2 tsp ground Nutmeg
1/2 tsp ground Ginger
1/4 tsp ground Cloves
1 prepared Pie Shell or Flaky Pie Crust (below)

Blend all the ingredients in a food processor until creamy.  Spread into a pie shell.  Bake at 350°F for 1 hour.  Allow to sit a couple hours before serving.

Flaky Pie Crust

1 ½ cups Unbleached White Flour
½ cup Soy Margarine (Cold)
½ tsp Sea Salt
4-6 Tb Ice Water

Place flour and salt in medium-size bowl. Break up margarine and cut into flour with a pastry cutter until there are pea-sized pieces of dough. Slowly add ice water and blend with fork. Do not overwork; blend until just mixed and dough holds together. Use a rolling pin to roll the dough to be slightly larger than your pie pan. Place in pie pan and form dough as desired. Add pie filling to the crust and bake according to pie instructions. Makes one 9-inch pie crust. 
Other Thanksgiving Recipes

Wednesday, December 22, 2010

Coconut Almond Cake Balls

I was hosting a thank you dinner for people who helped me move recently, and I wanted to create the best possible menu. I heard about cake balls and decided I needed to make this for dessert and make my own recipe for doing so. I actually made two batches (one gluten free) and it took me a lot of time. When I finally got to try the results of my time in the kitchen, I decided it was definitely worth it! These were a major hit and it shouldn't take you as long since you will only be making one batch and have a recipe to follow.


Coconut Almond Cake Balls

Coconut Cake:
1 cups Organic Unrefined Cane Sugar
½ cup Earth Balance Margarine
½ cup Silken Tofu, blended
1 ½ cups Coconut Milk
2 tsp Vanilla.
2 ½ cups Unbleached White Flour
1 Tb Baking Powder
½ tsp Salt
1 cup Shredded Coconut

Cream together the sugar and margarine. Beat in the tofu and then the coconut milk and vanilla. Add the flour, baking powder and salt and blend until just combined. Add the coconut and combine it using a spatula, careful to not over mix. Spread into 2 greased 9-inch round baking pans and bake for 25-30 minutes. Allow to cool.

*For gluten free, use 1 1/2 cups sorghum flour, 3/4 cup sweet white rice flour, 1/4 cup potato starch and 2 tsp guar gum instead of the white flour.


Almond Frosting:
2 ½ cups Powdered Sugar
2 – 4 Tb Coconut Milk
2 tsp Almond Extract
¼ cup Earth Balance Margarine

In a large bowl, blend together the sugar, almond extract and margarine. Add the coconut milk until the frosting is a consistency that is slightly softer than traditional frosting.

Chocolate Glaze:
2 cups Vegan Chocolate Chips
2 Tb Earth Balance Margarine
2 Tb Coconut Milk (or soymilk)
1 tsp Vanilla

Combine all the ingredients in a medium saucepan and heat on medium heat. As the chocolate melts, combine the ingredients to a smooth consistency with a fork. Turn down heat to the lowest temperature. Allow to cool on the lower heat so the chocolate is not hot. A double broiler can also be used.

Creating the cake balls: Prepare a large baking sheet with parchment paper or wax paper. Set aside. Crumble the cakes into the frosting bowl. Combine the crumbs and the frosting with a spatula. Once the frosting is evenly distributed to the cake crumbs, form it into cake balls and place on the baking sheet. Refrigerate about 1 hour to harden slightly. Take one cake ball at a time from the sheet and dip it in the chocolate with a toothpick, allowing all but the bottom of the cake ball to be covered. Set on parchment paper and continue with the rest of the cake balls. Once all cake balls have been chocolate covered, return to the refrigerator for at least 1 hour. After 4 hours, store in a sealed container for up to 5 days.

Saturday, November 27, 2010

Dinner with the Fam - Part 1

I had to post this recipe right away since my mom kept asking me about it after making it for my family. Although I spent Thankgiving day with friends, I brought an extra gluten roast up to my parents for a visit. I also make a kale salad and this coconut veggie soup. Funny thing is, my mom had just bought some coconut milk for the first time since she has seen it in so many recipes, and then suddenly could not find one to use it. Now, here is a recipe!

This soup was eaten quickly at dinner with no left overs, not even enough to save some for my sister who was not there since she was sick. I made a different version for lunch the next day with broccoli, red onion, yellow squash and orange bell pepper. Again, there was no leftovers to share with my sister. Good sign! Hope you enjoy the recipe as much as my family!


Coconut Veggie Soup

1 head of Cauliflower, chopped
3 Carrots, chopped
3 cloves Garlic, minced
1 Leek, chopped
1 tsp Olive Oil
3 cups Vegetable Broth
1 can Coconut Milk
1 tsp Garlic Granules
1 tsp Onion Granules
1 Tb Parsley Flakes
Juice of 1 Lime
Salt and Pepper to taste

Saute the cauliflower, carrot, leek and garlic in the olive oil until the vegetables start to soften. Add the broth, coconut milk and seasoning and cook about 15-20 minutes. Squeen the lime juice into the soup along with salt and pepper. Cook an additional 5 minutes, or until vegetables are to desired texture. Makes 6 servings.

Monday, May 10, 2010

Betty White Party with lots of food


Betty White has done a lot for animals in her lifetime and she has also delivered a great amount of laughs. When a campaign to see her host Saturday Night Live appeared on facebook, I joined right away. And when she was finally announced to host SNL, I organized a party right away. When I throw a party, what food I will serve becomes my first planning task. I have a few friends that eat gluten free, so I did know I wanted a least most of it to be safe for everyone to eat.

I decided on a host of dips and stuffed stuff. This included my popular Roasted Red Pepper Cashew Spread, White Bean Artichoke Heart Dip and Tofutti Sour Cream with a Frontier Organics French Onion Soup dry mix.


I also served zucchini stuffed with a garbanzo tahini mash and small red potatoes stuffed with tofu celery salad. I served multiple veggies as well including cherry tomatoes I had hoped to stuff with guacamole but that became too much work, so I offered them for snacking instead.

For dessert I offered strawberries, a vegan whipped cream, sweet mini biscuits and cheesecake bites with an almond meal crust (gluten free).

Vegan Cheesecake Bites

Filling:
1 – 8 oz container Tofutti Cream Cheese
½ cup blended Silken Tofu
1/3 cup Organic Unrefined Cane Sugar
2 Tb Cornstarch
1 tsp Vanilla

Crust:
1 ½ cups Almond Meal
1 Tb Cornstarch
2 Tb Margarine, melted
1-2 Tb Almond Milk

Filling: Blend all ingredients in a food processor or blender until smooth.

Crust: Combine the almond meal and cornstarch. Using a fork, blend in the margarine. Add the almond milk until the meal starts to hold together when pressed.

Place about a tablespoon of the crust in a greased mini cupcake holder and press down. Filling the cupcake holder until about full. Bake at 350 degrees for 25 minutes. Allow to cool before serving.

Luckily SNL with Betty White was hilarious and wondrous and the food was enjoyed between the laughs.

Monday, May 3, 2010

Brownie Bites (Gluten Free)

I made these for a bake sale to benefit SPECIEES. I wanted to offer something that was gluten free since there seems to be more and more demand for it. This recipe uses almond meal flour and cornstarch instead of white flour so it has a great taste and no xanthan gum was needed. I have found that blended silken tofu is best egg replacement in brownies. The resulting product is rich in choclate taste and decadent in texture. Yumm!


Brownie Bites

1/2 cup Non-Dairy Margarine, melted
1/2 cup Cocoa, unsweetened
1 cup Organic Unrefined Cane Sugar
½ cup Silken Tofu, blended
1 tsp Vanilla
2 Tb Corn Starch
1/2 cup Almond Meal Flour
1/2 tsp Baking Powder
1/4 tsp Salt

In a food processor, blend the silken tofu until smooth. Scoop out ½ cup and reserve left over for other baking or for making a “pudding” by blending the tofu with melted chocolate chips and sugar or make a “creamsicle”.

Combine the melted butter and cocoa, stirring to combine. Add sugar, blended tofu and vanilla and beat until smooth. Add the almond flour, cornstarch, baking powder and salt and mix to combine. Scoop the batter by the spoonful into a greased mini muffin pan, filling each space about 2/3 full. Bake at 350°F for 15 minutes and then let cool 15 minutes. Makes 32 brownies bites.

Wednesday, October 14, 2009

Buckwheat Stuffing

I was preparing for a cooking class all about seitan and gluten making when I decided I wanted to make stuffing for the Thanksgiving Gluten Roast. The roast dough is wrapped around the stuffing and it works wonderfully for a Thanksgiving dinner. I didn’t have any breadcrumbs though, so I looked around my pantry. I recently discovered Buckwheat Groats even though I knew of them for many years. Buckwheat is almost circular in shape, has a mild flavor, cooks up in a jiffy and is a super nutritious whole grain. The class participants demanded I include the recipe on my blog so here you go!


Basic Buckwheat Stuffing

1 cup Buckwheat Groats, dry
2 cups Vegetable Broth
2 Tb Earth Balance Margarine
3 stalks Celery, chopped
½ cup Onion, chopped
1 tsp Sage, rubbed
1 tsp Parsley
¼ tsp Black Pepper

Cook the buckwheat in the broth until absorbed, about 15 minutes. In a frying pan, melt the margarine and add the celery and onion and cook until soft. Add the cooked buckwheat groats to the celery/onion sauté and add the sage, parsley and pepper, stirring to combine. Serve by itself as a side, or in the recipe for the Thanksgiving Gluten Roast.

The seitan and gluten recipes will be posted next!

Wednesday, June 3, 2009

Playing with Rhubarb


One of my co-workers brought in a lot of rhubarb from his garden for people to take home. I don't know if I've had rhubarb as an adult, so I was excited to grab myself a good amount of it to make a pie. I was going to a potluck that weekend as a part of Try Vegan PDX, so I decided to share. I had no idea if the pie worked out until I tried it and I loved it! I will definitely be playing with rhubarb some more. Often times there are people at the potluck who are gluten free, and I have another friend who is soy and cane sugar free as well, so I ended up making two pies.


Rhuberry Pie

Crust:
2 cups Unbleached White Flour
1/2 tsp Salt
1/2 cup Margarine
8-10 Tb Ice Water

Filling:
3 cups Rhubarb, cut
1 cups Strawberries, sliced
1/3 cup Unbleached White Flour
1 Tb Lemon Juice
1 cup Unrefined Cane Sugar

Combine the flour and salt in a bowl. Cut in the margarine with a pastry cutter to pea sized pieces. Slowly add the water a tablespoon at a time to the desired consistency. The dough should not be sticky, but it should also hold together in a ball. Divide the dough so one ball is 2/3 of the dough and the other is 1/3 of the dough.

Roll out the 2/3 part dough to be a bit larger than a 9-inch pie pan. When the dough is placed in the pie pan, it should slightly hand off the sides.

For the filling, combine all the ingredients in a medium bowl. Place the filling inside the pastry crust and set aside. Roll out the reserved dough to a circle just a little larger than the circumference of the pie pan. Place carefully over the pie filling and side. Combine the top and bottom crusts with your fingers and design as desired, or just leave plain. Bake at 400 degrees for 45 minutes.


Gluten Free, Soy Free and Sugar Free Rhuberry Pie

The insides of this pie were good, except it needed a little more thickener which I have already added to the recipe for you. the crust held the pie fine, but it was a bit tough and wanted to stick to the pie pan. I would recommend greasing the pie pan well.

For the dough, I used 1 1/4 cups Sweet White Rice Flour, 1/4 cup Organic Coconut Flour and 1/2 cup Tapioca Flour instead of the flour. I also used Spectrum Shortening instead of margarine so it would be soy free. The directions are mostly the same for the dough except that I used wax paper to roll out the dough.

For the filling, instead of sugar I used 2/3 cup Agave Nectar and Tapioca Flour instead of white flour. The dough pieces was harder to form together but it worked out fine.

Sunday, April 12, 2009

Upcoming Gluten Free Baking Class

This week I am teaching a gluten free baking class which I am excited about.  I have taught other classes but this will be the first gluten free one.  I feel I have gained a lot of knowledge about this type of baking and wanted to share the information with others.  Here are the details if you want to join!

Gluten Free Baking Class

Thursday, April 16th at 7pm

Sunnyside United Methodist Church
3250 SE Yamhill Street
Portland, OR 97214

* Learn the basics of gluten free baking
* Explore the different flour options
* Recipes for cakes, pancakes and biscuits
* Samples will be provided!

$10 supply fee.  Pay online or bring cash or check to the class.  For more information and to pay online, go to www.tryveganpdx.com

This weekend I visited my family in Cathlamet, WA.  One of my favorite things to do when I go there is to drive through a wildlife refuge just a short distance away.  This weekend I saw an immature bald eagle (pictured), red tail hawks, always great blue herons, a raccoon, northern pintails, shovelers, wood ducks, wigeons, lesser scaups, killdeer, white-tailed deer, common merganser and a shore bird I think is a surfbird.  I was especially excited to see all the common mergansers, about a group of eight of them, since I never see them and I think they are such fascinating birds.  I also got to see osprey and bald eagles from my parents back yard which faces the Columbia River.  So beautiful!

Tuesday, March 3, 2009

Mac & Cheese with Gluten Free Options

Most vegans have a version of Macaroni & Cheese that they like to make.  There are so many different recipes to make a vegan version, you could have a new mac & cheese every night of the week.

When I first started to eat vegan, there weren't all the hip cookbooks now available.  Luckily there was one which I found to have lots of flavor.  The New Farm Vegetarian Cookbook helped me appreciate a vegan diet and all the possibilities with my new diet.  There are some great recipes for baked goods, what to do with nutritional yeast and make it taste wonderful and even how to make your own tempeh and soymilk.  The recipe for Macaroni and "Cheese" Casserole showed me a new love for this old time favorite dish.

For most of my vegan life, I have made the cheese sauce for the noodles and baked it as directed in the original recipe.  Recently I started just mixing the sauce with the noodles and have found this to be a creamier version I am really enjoying.  There is also less fat used in my version of the recipe which I will share with you today.  I am no longer on my gluten free diet, but luckily last month I was so I have gluten free options  to share as well.  Now this dish can be enjoyed by even more people!

Mac & Cheese

1/3 cup Soy Margarine
1/2 cup Unbleached White Flour*
3 cups Water
1 tsp Salt
1 tsp Garlic Granules
2 Tb Braggs
2 Tb Oil
1 cup Nutritional Yeast
16 oz. Pasta*

*For gluten free options use 1/3 cup White Bean Flour instead of the unbleached white flour and rice, quinoa or corn pasta instead of wheat pasta.

Cook the pasta according to the package directions, drain and set aside.

In a medium pan, bring the water to a boil.  In the mean time, melt the soy margarine on medium heat.  When melted, add the flour and blend with a whisk to make a roux and allow to cook until smooth and bubbly.  Add the boiling water (carefully) along with the salt, garlic granules and braggs.  Continue to heat until the sauce starts to thicken.  When it reaches a good consistency, add the oil and nutritional yeast and whisk until fully incorporated.  Add the cooked pasta to the cheesy sauce.  Serve right away or add your own twist and then serve.

Other options:  Some people like adding a pinch of tumeric for a more orange color.  You can also add chipolte tabasco sauce for a unique flavor, add hickory smoke, add tomatoes or other vegetables, add tempeh, tofu or setain to the dish, use flavor themes such as a mexican twist and even use different types of pasta shapes.  Be creative!